Deploying BTCPay Server with Monero on kyun.sh
Kyun.sh runs a catalogue of one-click server “recipes.” The BTCPay Server – Monero recipe builds a complete, ready-to-run payment stack for you: the BTCPay Server application, a Monero node and wallet, and HTTPS configured. You pick a location, assign a web address, pay, and about half an hour later you have a running store.
If you’d rather run everything yourself on your own hardware instead of paying a host, see BTCPay with Bitcoin and Monero on External Disk for the self-managed Docker route. This guide is for vendors that just want it running, and don’t want to manage servers directly.
What you’re deploying
The recipe runs five services together on one server. You never manage them directly. This table just shows what’s under the hood.
| Service | What it does |
|---|---|
| BTCPay Server | The payment processor and admin dashboard you log into. Creates invoices, tracks payments, manages stores. |
| Monero daemon | Your own node on the Monero network, so you don’t rely on anyone else’s node to confirm payments. |
| Monero wallet | A view-only wallet. It sees incoming payments to your store but cannot spend. |
| Database | Stores your invoices, settings, and account (PostgreSQL). |
| Caddy | Puts your store on the web and gets a real HTTPS certificate automatically. |
1. Before you start
Have these ready. It makes the rest go smoothly:
-
A domain name you control, where you can add a CNAME DNS record. A subdomain is ideal, e.g.
pay.mystore.com. If you don’t have one, Kyun can give you a freekyun.liaddress instead. See step 5. - Funds to pay Kyun. Roughly €13–50 per month. Kyun accepts Bitcoin and Monero.
- About 30 minutes of hands-on setup. After that the Monero node syncs the blockchain on its own, which takes several hours but needs nothing from you.
-
Monero wallet details, for step 11:
- the primary address - begins with
4 - the private view key
- the restore height
- the primary address - begins with
2. Open the recipe
- Go to kyun.sh/mesa/recipes.
- In the search box type
btcpay. One result appears: BTCPay Server – Monero. - Click the card. A panel opens showing screenshots, the five container images, and its minimum specs: 2 vCPU, 4 GB RAM, 120 GB disk.
- Click Pick Recipe. This opens the configuration page, where the remaining steps happen.
3. Choose a location
The Location section allows you to select a city for your server. Use the arrows or click a location on the map. There are three data centers:
| Site | Upstream network | Notes | |—|—|—| | Amsterdam, Netherlands | Hostslim | Europe. CPU 2.5+ GHz. | | Spokane, Washington, USA | Crunchbits | North America. CPU 2.6+ GHz, 1 Gbit link. | | Bucharest, Romania | NXDATA | Eastern Europe. CPU 2.2+ GHz. |
Pick whichever is closest to you or your customers. The exact hardware differs a little by site: clock speed, network link, and how much local disk each server has.
4. Choose the server size
The System Specs section has three sliders and one checkbox. The price at the bottom of the page updates as you move them.
These are minimums for a working stack. Size up based on your own expected payment volume and performance needs.
| Setting | Minimum | Advice |
|---|---|---|
| RAM | 4 GB | Below this, the Monero node and BTCPay can struggle. |
| CPU | 2 vCPU | Fine for a low-volume store; scale up for heavier traffic. |
| Disk | 120 GB | Mostly for the Monero blockchain. The node runs pruned, so it needs less than a full node, but the chain still grows over time. |
| Public IPv4 | On | Leave it on. A public store needs a public address. |
5. Set your domain and create the DNS record
In the Configuration section, open the Domain dropdown. There are three choices:
| Option | What it means |
|---|---|
| Permalink | A free auto-generated address like sage-flame-rift.mesa.kyun.li. No DNS to set up. Fine for testing; not a real store address. |
| Kyun Subdomain | A name you choose under kyun.li. Free, no DNS to set up. |
| External Domain | Your own domain, e.g. example.com. This is the default deployment for a vendor. |
Choose External Domain and type just the hostname. The form then shows you the exact DNS record for a domain:
Go to wherever you manage DNS for your domain and add a single record:
| Type | Name | Value |
|---|---|---|
| CNAME | your subdomain (e.g. btcpay) |
the mesa.kyun.li URL shown on the form |
6. Storage: local disk vs. bricks
Scroll to the Storage section. It lists every data volume the stack uses:
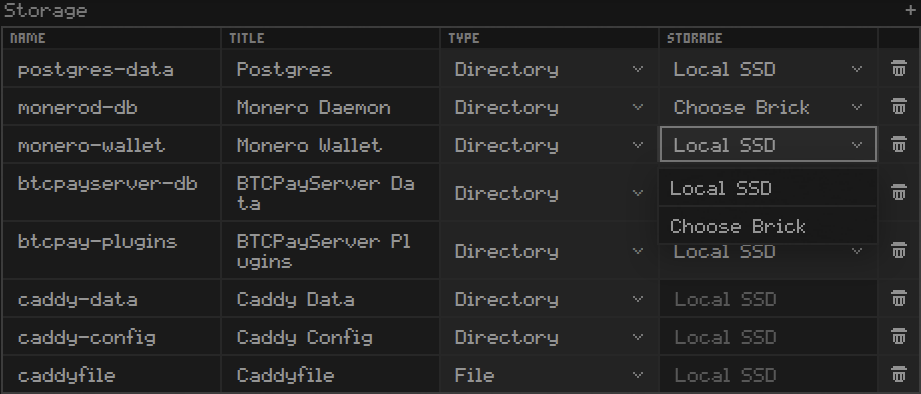
Local SSD is space on the server’s own disk, counted in the disk size you set in step 4. Fastest and simplest. This is the default and the right choice for most deployments, so leave every row on Local SSD and move on.
Choose Brick attaches a brick: a separate storage volume that belongs to your Kyun account rather than to this one server. Selecting it asks you to log in and pick one of your bricks (buy them separately in your Kyun dashboard).
Reach for a brick only when:
-
the server you land on doesn’t have enough local SSD. Depending on which server Kyun assigns, the Disk slider in step 4 may not reach the ~120 GB the Monero blockchain needs. Put
monerod-db(the large volume) on a brick to make up the difference, and leave the rest on Local SSD. - you want data to outlive the server, e.g. so you can rebuild the VM later without re-downloading the entire Monero chain.
7. Leave the remaining sections alone
The Containers section and Advanced - Enable IPv6 are already filled in correctly by the recipe. You do not need to change anything.
- Containers: the internal settings of each service (volume paths, network ports, environment values, health checks). Everything the Monero node, wallet and BTCPay need to talk to each other is pre-wired.
- Advanced - Enable IPv6: leave it on unless you have a specific reason to be IPv4-only.
Rule of thumb. If you don’t know what a field does, don’t change it. A wrong value here can stop the stack from starting.
8. Pay and wait for the build
- Check the summary bar at the bottom: location, size, container count, and monthly price.
- Click Purchase and pay the invoice with Bitcoin or Monero.
- Kyun now builds the server: it creates the virtual machine, downloads the five service images, and starts them in order. This typically takes 20–30 minutes to configure.
- When it finishes, your Kyun dashboard shows the server as running. Your permalink address works immediately as a fallback; your own domain works as soon as the CNAME from step 5 has propagated and the certificate is issued.
9. Create your BTCPay account and store
- Open
https://your-domainin a browser. - The first person to register becomes the administrator. Do this yourself immediately with a strong password.
- Create your store: give it a name and pick your default currency (e.g. USD, EUR).
10. Install the Monero plugin
The recipe sets up the Monero node and wallet containers, but the Monero plugin must be installed from the Plugin Directory in BTCPayServer.
- In the top-right of the menu bar, click the plugins icon and select Plugin Directory.
- Search for Monero and click Install.
- Restart BTCPay when prompted. When it comes back, Monero will be listed under the Wallets section of the store. Monero settings are visible to the server admin only.
11. Configure Monero
Monero settings live under Wallets - Monero in your store (visible only to the server admins).
- Open Wallets - Monero. The top of the page shows node and wallet-RPC status and the current sync height.
- Under Set View-Only Wallet Details, enter:
-
Wallet Primary Address: your stores wallet’s main address (starts with
4). - Wallet Private View Key: the view key for that wallet.
- Restore Height: the block height the wallet was created at, so it doesn’t scan history from before it existed.
-
Wallet Primary Address: your stores wallet’s main address (starts with
-
Click Set Wallet Details.
BTCPay creates a view-only wallet from those keys; it becomes available after a short delay.
- Reload the page once the wallet is available, then set:
-
Account Index: leave at
0unless you deliberately use a separate account for this store. - Enabled: turn on to accept Monero.
- Settlement confirmation threshold: how many confirmations before an invoice is marked Settled (Store Speed Policy is a safe default).
Click Save.
-
Account Index: leave at
The view-only wallet holds no spend key: it generates a fresh subaddress per invoice and sees payments arrive, but cannot move your funds.
12. Wait for sync, then test a payment
- The Monero node must finish downloading the blockchain before payments will confirm. On a first run this can take several hours depending on hardware. The Monero settings page in BTCPay shows the current sync height versus the network height.
- Once it reads as fully synced, create a small test invoice in your store and pay it from another Monero wallet.
- Confirm BTCPay moves the invoice to Settled after the expected number of confirmations. You’re live.
Notes
- Only ports 80 and 443 are exposed to the internet. The database, Monero node and wallet are reachable only by the other containers.
- Each service keeps its data in its own volume (database, Monero node and wallet, BTCPay data, and plugins), so the software can be updated without losing anything. Any of those five can be moved onto a brick (step 6).
- The database password is generated automatically and stored as a managed secret; you never see or set it.
- Image versions are pinned for reproducibility; Kyun tracks the upstream tags and manages updates.
Useful links
- Recipe source: git.kyun.sh/mesa/recipes
- BTCPay Server documentation: docs.btcpayserver.org
- Getting a Monero wallet address & view key: getmonero.org user guides